# NeuroWeb Network
"The way you train that (AI) system will have to be crowdsourced ... if you want it to be a repository of all human knowledge, all humans need to contribute to it." — Yann LeCun
NeuroWeb Network is a decentralized artificial intelligence (AI) blockchain designed to incentivize knowledge creation, connectivity, and sharing through **knowledge mining**. Its utility token NEURO is designed to fuel the AI knowledge economy, rewarding relevant knowledge contributions to the **OriginTrail Decentralized Knowledge Graph (DKG)**.
NeuroWeb builds on its predecessor — the OriginTrail Parachain — which was transformed into NeuroWeb via a community Governance vote on OriginTrail Parachain in December 2023.\
\
NeuroWeb is a permissionless, EVM-enabled blockchain secured by Polkadot validators.
Official website:
{% hint style="info" %}
This documentation page is a work-in-progress. We invite you to provide feedback and contributions on the [documentation GitHub repo](https://github.com/OriginTrail/neuroweb-docs).
{% endhint %}
# Roadmap
NeuroWeb Network is a decentralized artificial intelligence (AI) blockchain designed to incentivize knowledge creation, connectivity, and sharing through knowledge mining. Its utility token, NEURO, is designed to fuel the AI knowledge economy, rewarding relevant knowledge contributions to the OriginTrail Decentralized Knowledge Graph (DKG).
**2022 — NeuroWeb Inception**
* [x] NeuroWeb launches on Polkadot
* [x] Initial NEURO token distribution performed
* [x] EVM integration
* [x] Decentralized Knowledge Graph (DKG) deployed on NeuroWeb
**2023 — Journey to Decentralization: Empowerment of Token Holders**
* [x] NeuroWeb Governance 1.0 system established
* [x] Sudo removal empowers token holders with full control over the blockchain
* [x] NEURO — XCM Integration with Moonbeam
* [x] OriginTrail Parachain becomes NeuroWeb (OTP renamed to NEURO)
* [x] Knowledge mining for Decentralized AI campaign
**2024 - Crowdsourcing Knowledge with Initial Paranet Offerings (IPOs)**
* **Q1**
* [x] NeuroWeb wins second parachain auction — integration with Polkadot extended
* [x] Beta knowledge mining program for art
* [x] Whitepaper 3.0 [Verifiable Internet for Artificial Intelligence: The Convergence of Crypto, Internet and AI](https://origintrail.io/documents/Verifiable_Internet_for_Artificial_Intelligence_whitepaper_v3_pre_publication.pdf) published
* **Q2**
* [x] Multisig support enabled
* [x] DKG TRAC delegated staking on NeuroWeb
* [x] Knowledge mining with DKG paranets incentivization
* Initial Paranet Offerings (IPOs) launch
* **H2**
* [x] Major scaling boost: Asynchronous backing
* [x] Ledger hardware wallet support
**2025 — Autonomous AI systems**
**H1**
* [x] DKG V8.0 major release
* [x] Neuro XCM connection to Hydration
* [x] Polkadot-Ethereum trustless TRAC bridge
* [x] Stage 1: NeuroWeb-Ethereum bridge for TRAC token implementation to enable Hydration Omnipool TRAC liquidity
* [x] Stage 2: NeuroWeb-Ethereum bridge for TRAC token implementation to enable cross-chain transfer of TRAC tokens used for the DKG utility
* [x] Teleport system deprecation
* [x] DKG V8.1 major release
**H2**
* [x] Knowledge mining
* Cross-chain knowledge mining
* [x] Further XCM integrations pending Governance voting
* [x] Autonomous knowledge mining
* Autonomous knowledge publishing with DKG inferencing
* Knowledge contracts for AI agents v1
* AI agent integrations
* [x] DKG V8.2 major release
**H1 2026**
* [x] DKG V8.3 major release
**H2 2026**
* [ ] DKG V10 major release
# NEURO token
NEURO is the native token of NeuroWeb, a decentralized AI blockchain. It's used to incentivize knowledge creation, sharing, and connectivity through knowledge mining. NEURO powers the AI knowledge economy by rewarding valuable contributions to the OriginTrail Decentralized Knowledge Graph (DKG).
More info on the NEURO token available in the next pages:
# Tokenomics
Economics of verifiable internet for AI
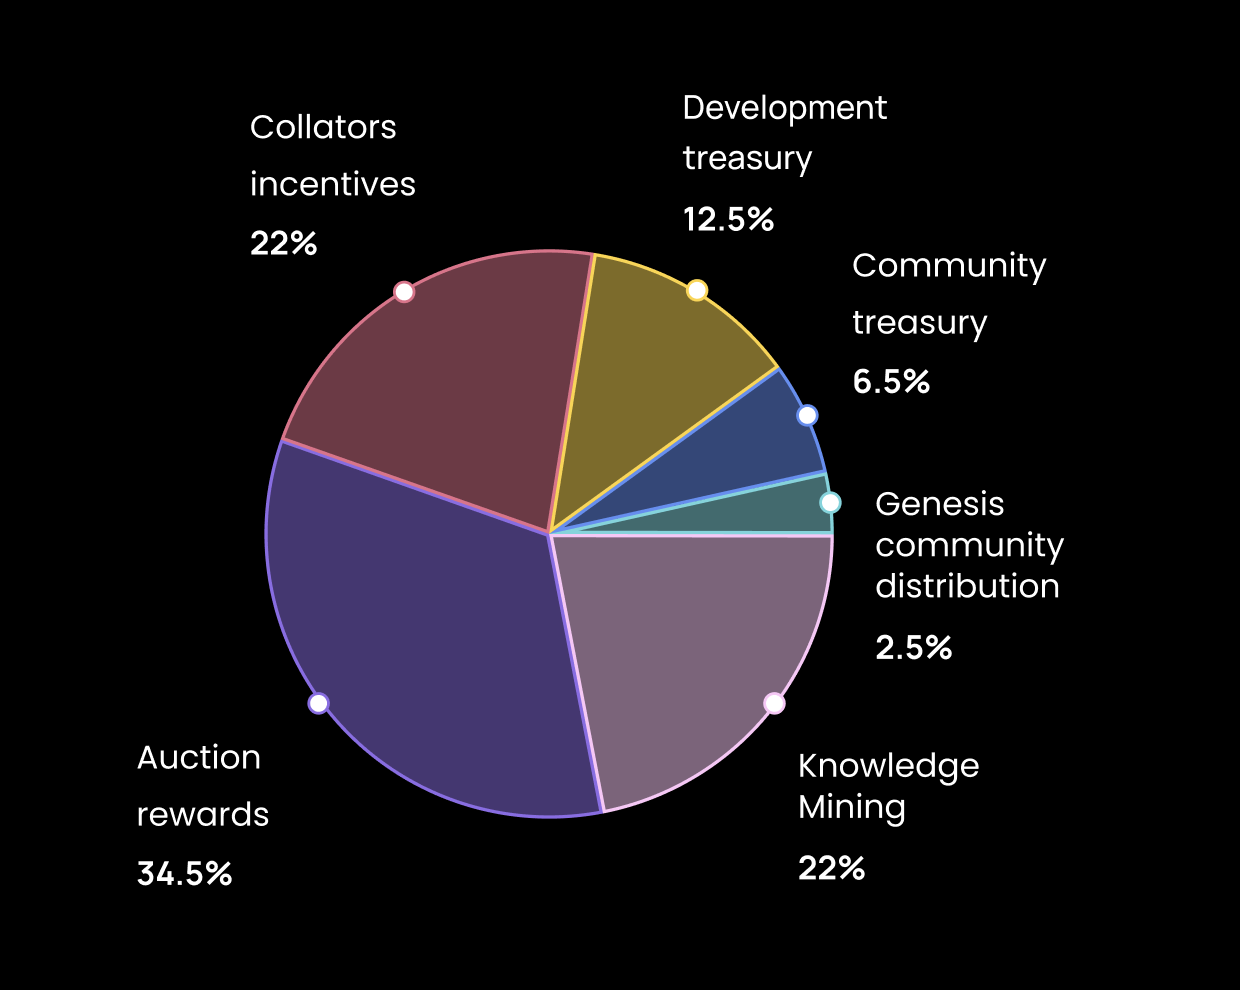
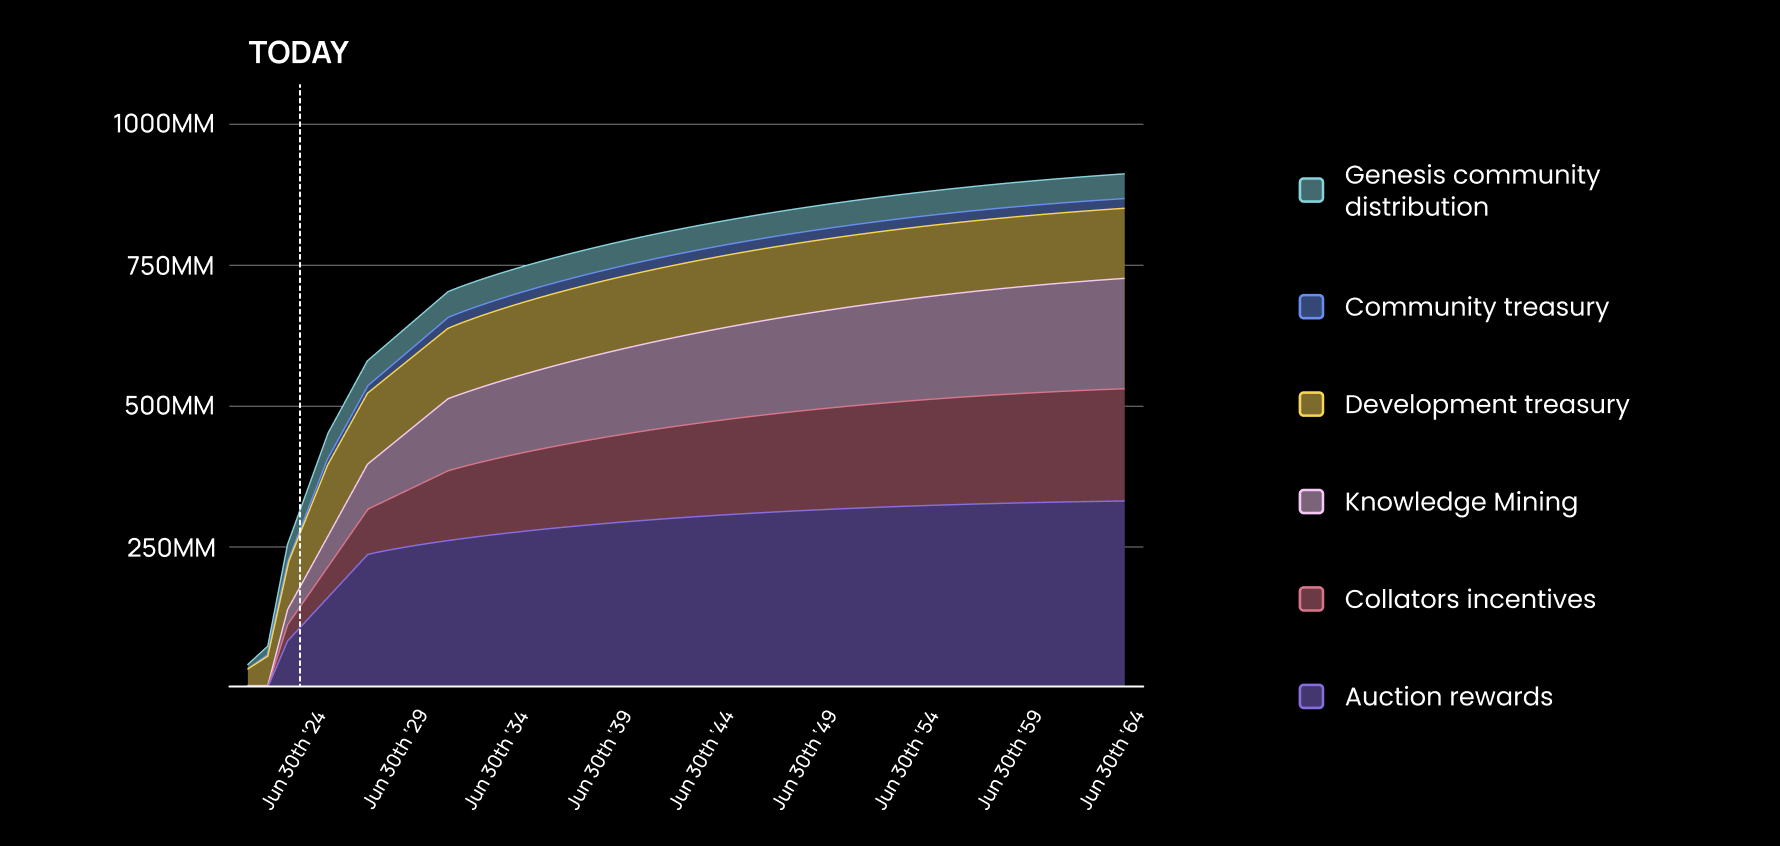
The total supply of NEURO that will ever be created is limited to 1,000,000,000 tokens. However, out of the maximum amount of tokens, only half was initially allocated, whilst the remaining half is minted through inflation in perpetuity, asymptotically reaching a 1,000,000,000 NEURO maximum supply.
The total allocation among different pools taking into account both the genesis release and the inflationary release is as follows:
* Collators incentives — 22%
* Auction rewards — 34.5%
* DKG paranets incentivization (knowledge mining) pool — 22%
* Treasury — 12.5%
* Community treasury — 6.5%
* Genesis community distribution — 2.5%
Genesis distribution
### Circulating supply
Circulating supply
# Exchanges
Here, you'll find information on where and how to acquire NEURO tokens, the native utility token of NeuroWeb. Before diving into exchanges, check out [NeuroWeb's page on CoinGecko](https://www.coingecko.com/en/coins/neurowebai) for comprehensive data and insights on the NEURO token.
#### Centralized exchanges (CEX)
Centralized exchanges (CEXs) are traditional cryptocurrency trading platforms where transactions are managed and operated by a centralized authority.
NEURO tokens are available for trading on the following exchanges:
* [MEXC Exchange](https://www.mexc.com/exchange/NEURO_USDT)
* [Gate.io Exchange](https://www.gate.io/trade/NEURO_USDT)
#### Decentralized Exchanges (DEX)
Decentralized exchanges (DEXs) operate without a central authority, allowing users to trade cryptocurrencies directly with one another through smart contracts on blockchain networks.
NEURO tokens are available for trading on the following decentralized exchanges:
* [Stellaswap](https://app.stellaswap.com/pulsar?tab=community-pools)
* Users can access the NEURO/TRAC trading pair from a community pool
# Ethereum-NeuroWeb TRAC Bridge
The TRAC Bridge between Ethereum and Neuroweb leverages [**SnowBridge**](https://app.snowbridge.network/)**, a trustless, Polkadot-native bridge,** **secured entirely by Polkadot’s blockchain instead of third-party services or risky multisigs**. This means the bridge is **backed in its entirety by the consensus mechanisms of Ethereum and Polkadot** (which has the highest Nakamoto coefficient of all blockchains).
\
To start bridging, visit the [**Snowbridge UI here**](https://app.snowbridge.network/) and follow the steps below
{% hint style="info" %}
Neuroweb **supports 2 wallet groups: Ethereum wallets (EVM-compatible) and Substrate wallets (Polkadot).** Bridging from Ethereum to Neuroweb involves **using both wallets:**
* **Ethereum wallet** on the Ethereum side,
* **Substrate wallet** on the NeuroWeb side.
{% endhint %}
## Bridging TRAC from Ethereum to Neuroweb
Before you begin, make sure you have an:
* **Ethereum account on an Ethereum wallet** (e.g. [Rabby](https://rabby.io/), [MetaMask](mailto:undefined)) with:
* **TRAC tokens** you want to bridge
* **ETH** to pay for transaction fees
* **NeuroWeb account** on a Polkadot-compatible wallet like [Talisman](https://talisman.xyz/), [Nova Wallet](https://novawallet.io/), [SubWallet](https://www.subwallet.app/), etc.:
* **NEURO** tokens in the account (required for the final step)
{% hint style="info" %}
To use your bridged TRAC for **staking** or **publishing on the DKG**, you must first **map your Polkadot (NeuroWeb) address to your** **EVM address** using this [mapping interface](https://neuroweb.ai/evm).
{% endhint %}
### 1. Select the direction from Ethereum to Neuroweb
Visit the [**Snowbridge UI here**](https://app.snowbridge.network/). Choose the right blockchains
* **FROM:** Ethereum
* **TO:** NeuroWeb
### 2. Connect your wallets
1. Click **Connect Wallet** and choose your Ethereum wallet (e.g., MetaMask).\
Follow the prompts: once connected, you’ll see your Ethereum address in the **FROM ACCOUNT** field.
2. Click **Connect Wallet** again to connect your NeuroWeb wallet.\
Select your Polkadot-compatible wallet and account.
{% hint style="warning" %}
**NOTE:** Your NeuroWeb account **must be funded with NEURO tokens** for the finalization step.
{% endhint %}
After both wallets are connected, the form should look like the example below.
### 3. Enter the amount to bridge
* Insert how many TRAC tokens you want to bridge in the **amount** field
* Click **Submit**.
After you click **Submit**, a new confirmation screen will appear showing the bridging details, including the amount and the addresses involved. Take a moment to review this information before continuing.
{% hint style="warning" %}
**Double-check both addresses** (your Ethereum sender & NeuroWeb recipient).
{% endhint %}
### 4. Execute Approve & Transfer transactions on Ethereum
A confirmation screen will show the details of the bridge transaction.
1. Click **Approve**. Your Ethereum wallet will pop up to initiate the TRAC approval
2. Click **Transfer**. Your wallet will pop up again — confirm the transfer transaction.
3. Wait until the bridge shows that the transfer is complete. This transfer can take up to 25 minutes in the current version of Snowbridge.
### 5. Wait for finalization
You will be moved to a window showing the transaction status. This step may take up to 25 minutes.
{% hint style="warning" %}
**NOTE:** You’re almost done! After this transaction is confirmed, there’s one more quick step: you’ll need to **finalize the bridging** to complete the transfer and receive your TRAC on NeuroWeb.
{% endhint %}
When the transfer is confirmed, the **Finalize Bridging** button becomes active.
### 6. Finalize Bridging (NeuroWeb)
1. Click **Finalize Bridging**.
2. Your NeuroWeb (Polkadot) wallet will pop up — approve the transaction.
3. Once confirmed, your TRAC will be available in your NeuroWeb account.
Your TRAC is now on NeuroWeb and ready to use. If you mapped your addresses, you can start staking or publishing immediately.
For assistance, join the [OriginTrail Telegram channel](https://t.me/origintrail).
## Bridging TRAC from Neuroweb to Ethereum
Before you begin, make sure you have the following:
* **NeuroWeb account** on a Polkadot-compatible wallet like [Talisman](https://talisman.xyz/), [Nova Wallet](https://novawallet.io/), [SubWallet](https://www.subwallet.app/), etc.:
* **TRAC** tokens you want to bridge
* **NEURO** tokens to cover transaction fees
* **Ethereum account on an Ethereum wallet** (e.g. [Rabby](https://rabby.io/), [MetaMask](mailto:undefined)) with:
* **ETH** tokens in the account (to pay for gas when finalizing the bridge)
{% hint style="info" %}
**TIP:** Having both wallets installed and unlocked before starting will make the connection process smoother.
{% endhint %}
### 1. Select the direction from NeuroWeb to Ethereum
Visit the [**Snowbridge UI here**](https://app.snowbridge.network/). Choose the right blockchains
* **FROM:** NeuroWeb
* **TO:** Ethereum
### 2. Connect your wallets
1. Click the **Connect Wallet** button at the bottom of the form to link your **NeuroWeb wallet** ([Talisman](https://talisman.xyz/), [Nova Wallet](https://novawallet.io/), [SubWallet](https://www.subwallet.app/), etc.)**.** Once connected, your wallet name and address will appear in the **FROM ACCOUNT** field, just like in the example below.
{% hint style="warning" %}
**NOTE:** Make sure your NeuroWeb wallet has both **TRAC** (to bridge) and **NEURO** (to cover transaction fees).
{% endhint %}
2. Click **Connect Wallet** again to connect your Ethereum wallet (e.g. [Rabby](https://rabby.io/), [MetaMask](mailto:undefined)).
Select your Ethereum-compatible wallet and account.
After both wallets are connected, the form should look like the example below.
### 3. Enter the amount to bridge
* Insert how many TRAC tokens you want to bridge in the **amount** field
* Click **Submit**
After clicking **Submit**, you’ll see a confirmation screen summarizing your transfer details. Take a moment to review this information carefully.
1. Before sending your tokens to Ethereum, you first need to **unwrap your TRAC**.\
This step converts your NeuroWeb TRAC into “bridged TRAC,” which can then be transferred across the bridge.
* In the form, review your account information and TRAC balance.
* Enter the amount you want to bridge in the **Amount** field.
* Click **Initialize Bridging** to start the unwrapping process.
* Approve the transaction in your NeuroWeb wallet.
Once completed, you’ll see a confirmation showing that Step 1 — *Unwrap TRAC* — was successful.
2. After your TRAC has been unwrapped, the next step is to **complete the transfer**.
* You’ll see both steps listed in the interface:
* Step 1: Unwrap TRAC ✅ *(Success)*
* Step 2: Complete Transfer
* Click **Transfer** to continue with the bridging process.
* Approve the transaction again in your NeuroWeb wallet.
{% hint style="warning" %}
**NOTE:** Make sure you have enough NEURO in your wallet to cover the delivery and execution fees.
{% endhint %}
Confirm that all details are correct, then approve the transaction in your NeuroWeb wallet to continue. After approval, the transfer will begin and you’ll move to a progress screen that tracks your transaction status.
{% hint style="warning" %}
**NOTE:** You’ll see a short “Preflight checks successful” message before the transfer begins. This just means the bridge has verified that your transaction is valid and ready to go.
{% endhint %}
### 4. Wait for your transfer to complete
After approving the transaction in your NeuroWeb wallet, you’ll see a confirmation screen like the one below. It shows that your transfer has been successfully submitted and is now being processed by the bridge.
{% hint style="warning" %}
**NOTE:** Keep this page open until the transfer is finalized. You’ll see the status change to “Completed” once your TRAC arrives on Ethereum.
{% endhint %}
### 5. Confirm your transfer is complete
Once your transfer finishes, you’ll see a confirmation screen like the one below.
Your **Transfer Status** will change to **Complete**, which means your TRAC has successfully arrived on Ethereum.
You can now:
* Click **Uniswap** to access your tokens directly in the app.
* Click **See in History** or **Transaction History** to review the full transfer details.
{% hint style="warning" %}
**NOTE:** You can also open your Ethereum wallet to confirm that your bridged TRAC tokens are visible there. If you don’t see them immediately, import the TRAC token contract address (0xaa7a9ca87d3694b5755f213b5d04094b8d0f0a6f) to display your balance.
{% endhint %}
# Whitepapers
Here, you'll find information about the foundational whitepapers that outline the core concepts and vision behind NeuroWeb's trusted infrastructure for decentralized artificial intelligence (AI).
In 2022, OriginTrail introduced its ecosystem whitepaper 2.0. This whitepaper marks a pivotal moment as OriginTrail introduces its own layer 1 solution, the OriginTrail Parachain (now called NeuroWeb), running on Polkadot (layer 0). The NeuroWeb brings significant capabilities to incentivize DKG usage and growth, enhance efficiency without compromising decentralization, and foster network effects through interoperability with other blockchains.
OriginTrail's whitepaper 3.0 presents a vision for the future of AI through the concept of a **verifiable Internet for AI**, leveraging the synergies of crypto, internet, and AI technologies. It introduces the Decentralized Knowledge Graph (DKG), a novel approach to ensure the provenance, integrity, and verifiability of information utilized by AI systems. It aims to address the challenges posed by misinformation, data ownership, intellectual property rights, and biases inherent in AI technologies by **synergizing neural and symbolic AI approaches with Web3 technologies**. This vision combines NeuroWeb blockchain with the dynamic capabilities of AI to foster a democratic, ethically guided, and economically viable future for AI applications.
Read whitepapers on [the following link](https://origintrail.io/ecosystem/whitepaper).
# Knowledge mining
**Knowledge Mining** is the process of producing high-quality, blockchain-tracked knowledge for artificial intelligence, pioneered by the OriginTrail ecosystem. This cyclical process leverages the key component of the OriginTrail technology — Knowledge Assets — which are ownable containers for knowledge with inherent discoverability, connectivity, and data provenance.
Similar to the concept of Bitcoin mining, where miners collectively provide computing resources to the network and receive incentives in coins, knowledge miners who contribute useful knowledge to the OriginTrail DKG will receive NEURO tokens. With knowledge-mining incentives enabled across multiple blockchains, the ambition is to drive exponential growth of trusted knowledge in the OriginTrail Decentralized Knowledge Graph.
There are **4 general steps in the knowledge mining cycle**:
1. **Discovery** — During discovery, contributors discover profitable "gaps" in knowledge in the DKG, signaled by knowledge-consuming applications
2. **Publishing** — Once a gap is identified, knowledge miners create and publish a set of Knowledge Assets in the DKG. The aim is to incentivise high-quality Knowledge Assets (based on content, structure, usage signal, and other quality criteria)
3. **Enrichment** — Participants can collectively improve existing knowledge by various enrichment activities, such as connecting Knowledge Assets to existing high-quality Knowledge Assets (e.g. providing linking signal via [UALs](https://docs.origintrail.io/decentralized-knowledge-graph-layer-2/dkg-basic-concepts#what-is-a-ual)), providing economic signal (e.g., via knowledge market purchase activity, direct economic stake on specific Knowledge Assets, etc), and usage signal (e.g,. by utilizing specific knowledge, indicating its usefulness)
4. **Learning** — The system finally "learns" from previous steps in several ways, including DKG entity relevance updates (e.g., equivalent to PageRank), such as reasoning based on newly available knowledge, repopulating vector stores, and training AI models based on the newly acquired knowledge.
Knowledge miners publish to the DKG by spending TRAC tokens, utilizing the underlying blockchain native token for gas fees (e.g., NEUROon NeuroWeb, xDAI on Gnosis, ETH on Ethereum, etc), while receiving NEURO tokens based on the level of their contribution, regardless of their blockchain of choice to perform knowledge mining.
NEURO token incentives will be distributed to knowledge miners based on both the quality and quantity of their contributions, regardless of the blockchain they choose for knowledge mining. It's important to note that this mechanism is designed to evolve as Knowledge Mining develops. As the ecosystem grows, adjustments will be made to further improve the fairness and efficiency of the reward system until the system matures. This dynamic approach ensures that participants are continually incentivized and rewarded for their valuable contributions. The process of knowledge mining implementation is subject to updates guided by the decentralized governance system on NeuroWeb (governance details available in [OT-RFC-15](https://github.com/OriginTrail/OT-RFC-repository/tree/main/RFCs/OT-RFC-15-OriginTrail-Parachain-Governance)).\
\
Details of the Knowledge Mining process have been presented in OriginTrail community RFC 20 ([OT-RFC-20](https://github.com/OriginTrail/OT-RFC-repository/tree/main/RFCs/OT-RFC-20-Knowledge-Mining-for-Decentralized-AI))
# Knowledge mining beta program
The Knowledge mining beta program is intended to kick-start knowledge mining capabilities through an iterative process of **crowdsourcing knowledge** for decentralized artificial intelligence (AI) through NeuroWeb blockchain and NEURO token. During the beta knowledge mining program, a token pool of **200,000 NEURO** will be made available for miners contributing knowledge.
The knowledge mining beta program aims to feed learnings on the various approaches to incentivising knowledge mining via the NeuroWeb blockchain, ultimately implementing knowledge mining capabilities in production.
The beta program was focused on Art knowledge mining.
## Art Knowledge Mining
Compete for your part of the **200,000 NEURO** rewards pool among the vibrant community of artists that are adding their creations to the OriginTrail Decentralized Knowledge Graph as the first group of Knowledge miners.
{% hint style="danger" %}
Art knowledge mining is closed. Scroll down to check the final leaderboard of knowledge miners who contributed their art.
{% endhint %}
### Art Knowledge Mining via X
To get started with knowledge mining for art on X, you can utilize the @ChatDKG X bot.\
\
To mine knowledge, you can use the following commands:
* ***/mint*** command, which creates a new [Knowledge Asset](https://docs.origintrail.io/decentralized-knowledge-graph-layer-2/dkg-basic-concepts#what-is-a-knowledge-asset) from an existing image
* ***/imagine*** command, which creates a derivative art piece and corresponding Knowledge Asset from a provided art Knowledge Asset, with an appropriate connection in the DKG
To use the /mint command, simply tweet:
To use the /imagine command, simply tweet:
{% code overflow="wrap" %}
```
/imagine @ChatDKG [UAL of original artwork] | [Prompt for the new image] | [New artwork name] | [New artwork Description] | [Author Name]
```
{% endcode %}
## Leaderboard
# Knowledge Mining Kit
The Knowledge Mining Kit is a comprehensive set of tools, materials, and instructions designed to facilitate the creation and mining of Knowledge Assets on the Decentralized Knowledge Graph (DKG) and NeuroWeb blockchain.
This kit empowers users to efficiently gather, structure, and contribute valuable data, ensuring seamless integration with advanced AI systems and enhancing the overall knowledge ecosystem.
# JSON-LD tutorial
In this tutorial, you will learn how to prepare JSON-LD for Knowledge Assets creation, a data format that enables you to express Linked Data in JSON. *Knowledge Assets* are self-contained and structured pieces of knowledge that can be used across Web3 applications and linked to other Knowledge Assets in a decentralized knowledge graph. You will also learn how to use various tools to work with JSON-LD data, such as OpenRefine, JSON-LD Playground, jsonld.js, and Schema Markup Validator.
## Knowledge Assets
As a developer, you can create Knowledge Assets tailored to your specific use case, which can be used across Web3 applications. Knowledge Assets are self-contained and structured pieces of knowledge that can be linked to other Knowledge Assets and bring great value to your organization. You can apply standardized technologies such as GS1 EPCIS, RDF/SPARQL, JSON-LD, and other W3C and GS1 standards out of the box.
JSON-LDs are used to create Knowledge Assets. A Knowledge Asset is an ownable container for your valuable information that can describe any physical thing, document, abstract concept, number, or string. Your data is stored in a Decentralized Knowledge Graph, which makes it easily discoverable. The underlying blockchain safeguards the integrity of your information and the ownership of your Knowledge Asset. More on Knowledge Assets can be found [here](https://docs.origintrail.io/key-concepts/dkg-key-concepts) and [here](https://origintrail.io/technology/decentralized-knowledge-graph).
### JSON-LD
JSON-LD stands for JavaScript Object Notation for Linked Data. It is a lightweight JSON-based data format for encoding Linked Data. JSON-LD is easy to read and understand for humans and a powerful format for creating structured data.
**JSON and JSON-LD** are both data formats based on JavaScript Object Notation. The main difference is that JSON-LD adds a context to link the data to well-defined vocabularies, such as Schema.org. Adding context to link the data to well-defined vocabularies, such as Schema.org, and JSON-LD makes the data more semantic and machine-understandable. It is also compatible with Linked Data principles.
**Linked Data** is a powerful concept that allows data to be interlinked and become more valuable through semantic queries. Linked Data allows structured data to be published and interlinked, making it more useful through semantic queries.
In the context of knowledge graphs, Linked Data principles are used to create a network of data that can be easily queried and analyzed. **Knowledge graphs** are databases that use graph structures to represent data and its relationships. Using Linked Data principles, knowledge graphs can be created that are interoperable with other data sources from the knowledge graph, making it possible to combine data from multiple sources by connecting them to create a complete picture of a particular domain.
For further exploration of Linked Data and the concept of a knowledge graph, you can delve into additional resources available [here](https://docs.origintrail.io/general/kg).
**JSON-LD allows you to structure your data to align with Linked Data principles.** It achieves this through its unique features:
* **Context:** JSON-LD allows you to define a context for your data. This context provides a way to map JSON keys to specific meanings or vocabularies. By using a context, you can semantically enrich your data, defining how JSON keys relate to terms in an ontology or schema.
* **Compact and Expanded Syntax:** JSON-LD supports both a compact and an expanded syntax. The compact syntax is more human-readable and concise, while the expanded syntax is more verbose and suitable for machine processing. Both syntaxes represent the same data model but offer different levels of readability.
* **Linked Data Principles:** JSON-LD is designed to adhere to the principles of Linked Data. These principles include using URIs as resource identifiers, providing links to other resources, and using standard vocabularies or ontologies to define the meaning of terms. By following these principles, JSON-LD enables data to be easily linked and queried semantically.
Here is an example of JSON-LD code that describes a person:
```
{
"@context": "https://schema.org",
"@type": "Person",
"name": "John Doe",
"@id": "https://www.example.com/person/john-doe",
"jobTitle": "Software Engineer",
"telephone": "(123) 456-7890",
"url": "https://www.example.com",
"sameAs": [
"https://www.facebook.com/johndoe",
"https://www.linkedin.com/in/johndoe",
"https://twitter.com/johndoe"
]
}
```
This JSON-LD describes a person named John Doe, who is a software engineer.
If you use the `“@ID”` attribute in JSON-LD datasets, it must have a non-null value and be set to an Internationalized Resource Identifier (IRI). For more information on IRIs and their use in JSON-LDs, refer to this [resource](https://www.w3.org/TR/json-ld11/#iris).
In this example, the `"@context"` and `"@type"` fields are crucial in enriching the data by utilizing established schemas from Schema.org. These fields provide the necessary context to understand the structured data and specify that the information pertains to a person (identified by the `"@type"` field) within the context of Schema.org's vocabulary.
`@context` is a field in JSON-LD that defines the context for the data. It provides additional information about the meaning of the data, such as the vocabulary used to define the terms in the data. The context can be a URL that points to a JSON-LD context document, or it can be an object that defines the context directly in the JSON-LD document.
`@type` is a field in JSON-LD that specifies the type of the data. It is used to indicate the type of the object being described in the JSON-LD document. For example, in the JSON-LD code provided earlier, the `@type` field specifies that the data is describing a person.
Other fields are standard parts of the Person schema, additionally, more fields could be added to better describe the person, as can be seen [here](https://schema.org/Person). And more schemas can be found [here](https://schema.org/).
A detailed explanation of how to build and use JSON-LD can be found [here](https://www.w3.org/TR/json-ld11/).
### JSON-LD and Knowledge Assets
When crafting JSON-LD, it's important to consider how it will translate into a Knowledge Asset (KA), especially regarding the handling of private and public fields. By defining these fields in the JSON-LD format, you can maintain control over sensitive data within your Knowledge Asset, ensuring that it remains private while still allowing for the publication of relevant public information. Additionally, connecting your Knowledge Asset to existing knowledge within the Decentralized Knowledge Graph (DKG) through Universal Asset Locators (UALs) can significantly enhance its value and discoverability. These UALs serve as unique identifiers, similar to URLs on the traditional web, enabling seamless navigation and linking within the DKG.
#### Private and public fields
If you have sensitive data in your Knowledge Asset that you want to keep private, you can define private and public fields using JSON-LD. This allows you to control access to the private segment of the data, ensuring it is only accessible to you. To do this, you need to split the data into two JSON-LD properties: one that becomes public and one that becomes private.
By doing so, you can ensure that the private segment of the data is only accessible to you. The public part of your data is replicated to other nodes and is accessible to others, while the private part is stored only on your node and is accessible only to you.
Example of JSON-LD with public and private parts:
```
{
"public": {
"@context": "https://schema.org",
"@id": "https://tesla.modelX/2321",
"@type": "Car",
"name": "Tesla Model X",
"brand": {
"@type": "Brand",
"name": "Tesla"
},
"model": "Model X",
"manufacturer": {
"@type": "Organization",
"name": "Tesla, Inc."
}
},
"private": {
"@context": "https://schema.org",
"@id": "https://tesla.modelX/2321",
"productionDate": "2015-09-29",
"mileageFromOdometer": {
"@type": "QuantitativeValue",
"value": "25672",
"unitCode": "KMT"
}
}
}
```
#### Connecting data
To unlock the full potential of the Knowledge Assets, they should be connected to existing knowledge in the DKG.
For your Knowledge Asset to be connected to other Knowledge Assets, it needs to include the Universal Asset Locator of the asset you want to point to. The Universal Asset Locator (UAL) is a unique identifier used to locate and identify a specific Knowledge Asset within the OriginTrail Decentralized Knowledge Graph (DKG). It is similar to a URL in the traditional web and follows the DID URL specification. More on UAL can be found [here](https://docs.origintrail.io/decentralized-knowledge-graph-layer-2/dkg-basic-concepts#what-is-a-ual).
Example of JSON-LD connected to Knowledge Asset with UAL "did:dkg:otp/0x5cac41237127f94c2d21dae0b14bfefa99880630/1962724"
```
{
"public": {
"@context": "http://schema.org",
"@type": "ScholarlyArticle",
"@id": "https://alphasigma.docsend.com/view/vsm7pa46bzsf75mv",
"headline": "OriginTrail (TRAC) - The End of AI Hallucinations",
"publisher": {
"@id": "https://www.alphatransform.io/",
"isPartOf": "did:dkg:otp/0x5cac41237127f94c2d21dae0b14bfefa99880630/1962724"
}
}
}
```
By incorporating references to other knowledge assets through Unique Asset Locators (UALs) in your JSON-LD, you enhance the discoverability and context of your Knowledge Asset. This interconnected web of information contributes to a richer decentralized knowledge graph, where relationships between different assets are more easily understood. By participating in this ecosystem, your Knowledge Assets not only become more discoverable but also gain depth and relevance through the context provided by other assets. This interconnectedness ultimately enhances the value of your Knowledge Assets within the broader knowledge graph, contributing to a more comprehensive and valuable resource for all participants in the decentralized knowledge network.
### Tools
In this chapter, you will learn about some of the tools that can assist you in working with JSON-LD data. These tools can help you with various tasks, such as creating JSON-LD data from different sources, such as CSV, XML, or existing JSON data; validating JSON-LD data to ensure that it conforms to the JSON-LD specification and the Schema.org vocabulary; or transforming JSON to JSON-LD, by adding context and semantics to your JSON data. These tools can make your work with JSON-LD data easier and more efficient, and help you produce high-quality and standards-compliant data.
#### OpenRefine
OpenRefine is a free and open-source tool that lets you clean, transform, and extend your data from various sources. You can use facets, heuristics, reconciliation, and web services to work with large datasets and external databases. OpenRefine supports a wide range of file formats, including CSV, JSON, XML, ODS, XLS, and more. OpenRefine also supports extensions that add more functionality and features to the tool.
One of the extensions that OpenRefine supports is JSON-LD. You can use OpenRefine to create JSON-LD data from your existing data by adding a context column that links your data to well-defined vocabularies, such as Schema.org. You can also use OpenRefine to validate, export, and import JSON-LD data, as well as reconcile it with external sources.
You can find OpenRefine documentation [here](https://openrefine.org/docs).
#### JSON-LD Playground
JSON-LD Playground is a web-based JSON-LD viewer and debugger that allows you to explore and edit your JSON-LD data. You can also use it to visualize the data graph, expand or compact the data, and convert it to other formats, such as RDF or N-Quads2. JSON-LD Playground can be accessed [here](https://json-ld.org/playground/).
### Jsonld.js
jsonld.js is a JavaScript library that implements the JSON-LD specification, which is a standard for expressing Linked Data in JSON. JSON-LD allows you to add context and semantics to your JSON data, making it more machine-understandable and compatible with the Web of Knowledge. You can use jsonld.js to manipulate, expand, compact, frame, and normalize JSON-LD data, as well as convert it to other formats, such as RDF. You can also use jsonld.js to create and verify digital signatures for JSON-LD data, using various cryptographic algorithms and proof purposes. jsonld.js works in both Node.js and browser environments. You can see the jsonld.js repository on GitHub [here](https://github.com/digitalbazaar/jsonld.js).
#### Schema Markup Validator
Schema Markup Validator is a tool that lets you test your structured data using the Schema.org vocabulary, which is a widely used and supported vocabulary for describing various types of entities on the web. You can paste your JSON-LD code or enter a URL and see the results in a graphical or raw format. Schema Markup Validator can be accessed [here](https://validator.schema.org/).
# SDK
OriginTrail Software Development Kit
## SDK
The OriginTrail SDK is a set of software development tools that allows you to interact with the OriginTrail Decentralized Knowledge Graph (DKG). The DKG is a network of nodes that store and exchange data using semantic web standards and blockchain technology. With the OriginTrail DKG SDK, you can create, manage, and query knowledge assets on the DKG, as well as integrate with existing web3 applications.\\
The OriginTrail SDK is available in two implementations: Javascript and Python. Each SDK library provides an easy-to-use interface to connect to a local or remote Origin Trail gateway node, which acts as a bridge between your application and the DKG network.
## Setting up SDK
To configure both the JavaScript and Python clients, you need to provide the private and public addresses of your wallet. These wallets play a crucial role in the Knowledge Mining process, as they are used to publish knowledge assets.
It's important to remember that only Knowledge Assets that are published on the NeuroWeb mainnet are eligible for Knowledge Mining. Therefore, clients should be set up with this in mind.
To use the client, access to the DKG node is required. You can host the node yourself; more on node hosting can be found [here](https://docs.origintrail.io/build-with-dkg/quickstart-test-drive-the-dkg-in-5-mins). Or other node runners need to provide access.
### JavaScript Client — dkg.js
Full documentation on the JavaScript client can be found [here](https://docs.origintrail.io/build-with-dkg/quickstart-test-drive-the-dkg-in-5-mins/quickstart-with-node.js). Dkg.js is available on [github](https://github.com/OriginTrail/dkg.js) and [npm](https://www.npmjs.com/package/dkg.js).
### Python Client — dkg.py
Full documentation on Python client can be found [here](https://docs.origintrail.io/build-with-dkg/quickstart-test-drive-the-dkg-in-5-mins/quickstart-with-python). Dkg.py is available on [github](https://github.com/OriginTrail/dkg.py) and [pypi](https://pypi.org/project/dkg/).
{% hint style="info" %}
The OriginTrail SDK libraries are being built in various languages by the team and the community, expect more implementations in the future to become available!
{% endhint %}
# ChatDKG — X bot
Discover the power of decentralized knowledge mining with the ChatDKG X Bot! Here’s a quick guide to get you started.
To mine knowledge, use the `/mine` command. This command allows you to extract valuable information from websites and add it to the DKG and NeuroWeb.
Create a post on X with following content:
```
/mine @ChatDKG | |
```
#### Parameters
* **Website URL**: The URL of the website whose content you want to mine knowledge
* **EVM User Wallet**: Your EVM wallet address that you will use to claim knowledge mining rewards
* **Paranet Name (optional)**: The name of the paranet where you want to add the mined knowledge. Currently, only the **Polkabot** paranet is supported, with more to come soon
#### Example
```
/mine @ChatDKG https://wiki.polkadot.network/docs/learn-async-backing | 0x19bE11Eb85795B68D141b04C729910455f520546 | Polkabot
```
# NeuroWeb technical information
# Available networks
There are currently 2 public networks running NeuroWeb code:
1. **NeuroWeb Mainnet:** The NeuroWeb main network secured by the Polkadot Relay Chain, with NEURO as the native token and TRAC deployed as a native XC20 asset. This is the production environment.
2. **NeuroWeb Testnet:** The NeuroWeb test network secured by the Rococo Relay Chain hosted by Parity. This is the recommended development environment for anyone building on NeuroWeb.
### NeuroWeb Mainnet
Note: Because of the difference in token decimals between ETH (18) and NEURO/OTP (12), one token in MetaMask will be equal to 1 million NEUROs
### NeuroWeb Testnet
{% hint style="success" %}
The NeuroWeb Testnet is the testing environment for the NeuroWeb. It is the recommended environment for all DKG & Parachain development purposes — if you are building a dapp or smart contract, you can use the testnet as your "staging" environment.
{% endhint %}
Polkadot.js endpoint is available [here](https://polkadot.js.org/apps/?rpc=wss%3A%2F%2Fparachain-testnet-rpc.origin-trail.network#/explorer).
Metamask connection parameters:
Note: Because of the difference in token decimals between ETH (18) and NEURO/OTP (12), one token in Metamask will be equal to 1 million NEUROs
# Block explorers
Mainnet block explorer:
Testnet block explorer: [Polkadot.js Apps (NeuroWeb Testnet)](https://polkadot.js.org/apps/?rpc=wss%3A%2F%2Fparachain-testnet-rpc.origin-trail.network#/explorer)
# NeuroWeb EVM
NeuroWeb supports two types of blockchain accounts:
* **Substrate accounts** (Polkadot native, used with Polkadot wallets such as Polkadot.js), which are used for native NeuroWeb functionality
* **Ethereum accounts** (Ethereum native, used with Ethereum wallets such as MetaMask), which are used within the EVM
This enables NeuroWeb users to benefit from "both worlds". To enable the EVM functionality, users need to create a **mapping between their Substrate and Ethereum accounts** (wallets) to the NeuroWeb through a one-time transaction, which can be performed through [this interface](https://neuroweb.ai/evm) (before going to this interface, you need to fund your wallets with NEURO and TRACE test tokens; instructions are available here).
The interface uses an Ethereum wallet to sign the provided Substrate address and submit it as a transaction to the NeuroWeb, so that the Parachain runtime can verify that the two addresses are owned by the same user. Once the mapping is completed, you can use the NeuroWeb EVM functionalities. The account mapping interface doesn't have access to your wallet's private keys and only uses your wallet's signing and transaction functionalities to submit a valid transaction.
#### Why the need for two accounts?
NeuroWeb uses the native Substrate address format (H256), which is different from the Ethereum address format (H160), therefore it needs to enable usage of both in order to perform both Substrate native functionalities and Ethereum compatible activity. The Substrate address (wallet) is used for all native NeuroWeb functionality, such as NEURO transactions, collator delegation, governance features, etc, while the Ethereum address (wallet) is used for operations within the EVM environment, which include OriginTrail DKG transactions, deploying & interacting with Ethereum smart contracts deployed on NeuroWeb, and similar. In the future, the OriginTrail DKG is expected to move beyond the EVM implementation to a Substrate-native one, introducing capabilities such as Graph Contracts.
#### Which wallets can be used with NeuroWeb?
For all interactions with the EVM (including OriginTrail DKG), you can use any Ethereum-compatible wallet, such as e.g., MetaMask, in conjunction with a hardware wallet. For Substrate functionality, you need to use Substrate-based wallets.
#### Do I need to perform this mapping for my OriginTrail nodes?
The mapping should be performed for both management and operational wallets; otherwise, the node will not start.
# On-chain governance
In the NeuroWeb Governance, **active NEURO (previously OTP) token holders** and **the council** together administrate network upgrade decisions and can vote on various topics. Whether the proposal is initiated by the public (token holders) or the council, it will eventually have to go through a **referendum** to allow all NEURO holders, weighted by stake and conviction, to collectively make a decision on the proposal. To ensure timely governance, a General Council is elected to propose, cancel, and fast-track referendums.
## General Council
The General Council is an on-chain entity comprising several actors, each represented as an on-chain account. On NeuroWeb, the initial council consists of 5 members; however, the number of council members can be increased over time via governance proposals.
The council is called upon primarily for **three tasks of governance:**
1. **Proposing sensible referenda**,
2. **Canceling uncontroversially dangerous o**r malicious referenda,
3. **Fast-track** referenda proposal.
{% hint style="info" %}
Members of the council can be checked [here](https://polkadot.js.org/apps/?rpc=wss%3A%2F%2Fparachain-rpc.origin-trail.network#/council).
{% endhint %}
## Democracy
Democracy module handles the administration of general stakeholder voting and has the ability to perform root calls.
There are two different queues that a proposal can be added to before it becomes a referendum:
1. **The proposal queue** consisting of all public proposals,
2. **The external queue** consisting of a single proposal that originates from one of the external origins (such as the council).
Every launch period, the [Democracy pallet](https://crates.parity.io/pallet_democracy/index.html) launches a referendum from a proposal that it pulls from either the proposal queue or the external queue. Any token holder in the system can vote on referenda. The voting system uses **time-lock token-based voting** by allowing the token holder to set their **conviction** behind a vote. The conviction will determine **the duration the tokens will be locked** for, and the multiplier that scales the vote power.
{% hint style="info" %}
For more details on the implementation of the Democracy module in Substrate, please refer to this [link](https://crates.parity.io/pallet_democracy/index.html).
For more details on how to participate in democracy, please refer to this [link](https://wiki.polkadot.network/docs/maintain-guides-democracy).
{% endhint %}
### Referenda
Referenda are simple, inclusive, stake-based voting schemes. Each referendum has a specific proposal associated with it, which takes the form of a privileged function call in the runtime (that includes the most powerful call: set\_code = runtime upgrade).
Referenda are discrete events, have a fixed period during which the voting happens, are then tallied, and the function call is made if the vote is approved. Referenda are always binary; your only options in voting are "**aye**", "**nay**", or abstaining entirely.
Referenda can be launched in one of 3 ways:
1. Publicly submitted proposals.
2. Proposals submitted by the general council, either through a majority or unanimously.
3. Emergency proposals submitted by the general council (fast-tracked).
In the case of options 1 and 2, the voting lasts for a fixed period of time, and for option 3, the period can be set differently every time.
To vote in a referendum, a voter generally must lock their tokens up for at least the enactment delay period beyond the end of the referendum. This is to ensure some minimal economic buy-in to the result and to dissuade vote-selling.
Depending on which entity proposed the proposal and whether all council members voted yes, there are three different scenarios:
1. Public — Positive Turnout Bias (Super-Majority Approve);
2. The general council (Complete agreement) — Negative Turnout Bias (Super Majority Against);
3. The general council (Majority agreement) — Simple majority.
**Super-Majority Approve**
A positive turnout bias, whereby a heavy super-majority of aye votes is required to carry at low turnouts, but as turnout increases towards 100%, it becomes a simple majority-carries as below.
**Super-Majority Against**
A negative turnout bias, whereby a heavy super-majority of nay votes is required to reject at low turnouts, but as turnout increases towards 100%, it becomes a simple majority-carrying as below.
**Simple-Majority**
Majority-carries, a simple comparison of votes; if there are more aye votes than nay, then the proposal is carried, no matter how many stake votes on the proposal.
**Example**
For the demonstration below, let’s assume there are 1500 NEURO tokens in the network and the proposal is issued by the public (not by the general council).
* Peter: Votes No with 150 NEURO for a 16-week lock period => 150 x 3\* = 450 Votes
* Logan: Votes Yes with 500 NEURO for a 4-week lock period => 500 x 1 = 500 Votes
* Kevin: Votes Yes with 100 NEURO for a 4-week lock period => 100 x 1 = 100 Votes
\*The conviction multiplier increases the vote multiplier by one every time the number of lock periods doubles.
To calculate the voting result, we need 4 variables and the formulas listed below:
* Approve (number of aye votes) = 600
* Against (number of nay votes) = 450
* Turnout (total number of voting tokens, does not include conviction) = 750
* Electorate (total number of tokens issued in the network) = 1500
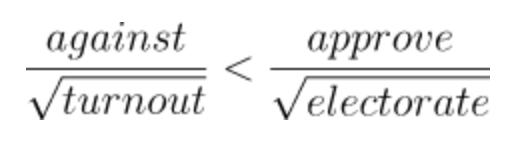
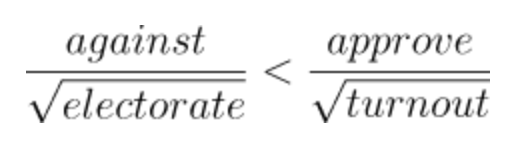
Since the referendum was proposed by the public (not the general council), the “Super Majority Approve” formula would be used to calculate the result
which yield
Super Majority Approve requires more aye votes to pass the referendum when turnout is low; therefore, based on the above result, the referendum will be rejected. In addition, only the winning voter's tokens are locked. If the voters on the losing side of the referendum believe that the outcome will have negative effects, their tokens are transferable, so they will not be locked into the decision.
{% hint style="info" %}
More details on voting and referendums are available [here](https://wiki.polkadot.network/docs/learn-governance#council).
{% endhint %}
# Voting on a referendum
This guide will walk you through the process of participating in a public referendum on NeuroWeb. By following these steps, you become an integral part of the decision-making process that shapes the future development of our ecosystem.
{% hint style="info" %}
This instructions are for NeuroWeb Mainnet. Same apply for NeuroWeb Testnet, you just need to access [Polkadot-JS interface for Testnet](https://polkadot.js.org/apps/?rpc=wss%3A%2F%2Fparachain-testnet-rpc.origin-trail.network%2F#/).
{% endhint %}
## 1. Open NeuroWeb Polkadot-JS interface
Click on the following link to open [NeuroWeb Polkadot-JS interface](https://polkadot.js.org/apps/?rpc=wss%3A%2F%2Fparachain-rpc.origin-trail.network#/).
{% hint style="info" %}
If you cannot identify your wallet in Polkadot-JS and you are using Polkadot-JS extension, refer to section below. Otherwise, contact us on [Discord](https://discordapp.com/invite/FCgYk2S) for assistance.
{% endhint %}
## 2. Navigate to the democracy interface
The voting itself will be executed seamlessly through the Polkadot-JS interface. To submit an on-chain vote in the Polkadot-JS UI, first navigate to the "Governance" > "[Democracy](https://polkadot.js.org/apps/?rpc=wss%3A%2F%2Fparachain-rpc.origin-trail.network#/democracy)" tab.
Polkadot-JS democracy interface
## 3. Click on the vote button
Here, you will see ongoing proposals and referendums. Click the "Vote" button next to the referendum you are interested in.
## 4. Select voting parameters
In the next menu, choose the amount of NEURO you'd like to vote with, as well as your vote multiplier.
{% hint style="warning" %}
Multiplying your vote is a unique feature in governance that allows you to increase your voting power by voluntarily locking up the tokens for a specified amount of time, also known as "conviction voting". You can read more on this[ here](https://wiki.polkadot.network/docs/learn-polkadot-opengov#voluntary-locking).
{% endhint %}
## 5. Submit your vote
Next, choose to vote either **Aye** or **Nay**. Sign and submit the transaction, and you're all set! You have successfully participated in on-chain governance.
\
If you're more of a visual learner, you can also watch [this tutorial video](https://www.youtube.com/watch?v=fHLhzrd5t-g\&ab_channel=Polkadot) on how to vote on Polkadot, the process is same for NeuroWeb.
## Polkadot-JS extension troubleshooting
1. Open extension and click on three dots on the right side
2. Click on the drop down menu, on the below image it is where is written "Polkadot Relay Chain":
3. Select "**Allow use on any chain**", refresh Polkadot-JS interface for OriginTrail Mainnet and go back to step 2.
If you run into any difficulties please post on [Discord](https://discordapp.com/invite/FCgYk2S) for assistance.
# Removing expired democracy locks
When you [vote for a Governance referendum](https://github.com/OriginTrail/neuroweb-docs/tree/main/on-chain-governance/broken-reference/README.md), your tokens are locked at least while the referendum is up for a vote. Once the referendum ends, the lock may expire or remain in place for a longer period, depending on your conviction and whether you voted with the winning side.
Regardless of the lock period, the lock will eventually expire, and once it does, you need to **manually remove it** to make the locked balance transferable again. The lock isn't removed automatically.
### How to remove expired democracy or referendum locks?
If you voted on referenda, click the arrow icon on the far right of your account, then hover over the little clock icon next to the democracy-locked balance. You can see if there are any locks that have expired:
**To remove an expired democracy lock, follow these steps:**
1. Click on the three dots on the right side of your account.
2. Select "Clear expired democracy locks":
3\. Then simply sign and submit the extrinsic, and all the expired locks will be removed.
# Submit a governance proposal
A proposal is a submission to the chain in which a token holder suggests an action to be enacted by the system. Proposals are one of the core elements of the governance system because they are the main tool for community members to propose actions/changes, which other token holders then vote on.
### Submitting a preimage of the proposal
The first step is to submit a preimage of the proposal. This is because the storage cost of large preimages can be pretty hefty, since they contain all the information about the proposal itself. With this configuration, one account with more funds can submit a preimage, and another account can submit the proposal.
First, navigate to [NeuroWeb's Polkadot.js Apps interface](https://polkadot.js.org/apps/?rpc=wss%3A%2F%2Fparachain-rpc.origin-trail.network#/preimages). Everything related to governance lives under the **Governance** tab, including preimages:
* From the **Governance** dropdown, you can select **Preimages**.
* Once there, click on the **Add preimage** button.
Here, you need to provide the following information:
1. **Select the account** from which you want to submit the preimage
2. **Choose the pallet** you want to interact with and the dispatchable function (or action) to propose. The action you choose will determine the fields that need to be filled in the following steps.
3. **Enter any additional fields** required for the extrinsic to be dispatched.
4. **Copy the preimage hash.** This represents the proposal. You will use this hash when submitting the actual proposal.
5. Click the **Submit preimage** button and sign the transaction.
Note that the storage cost of the preimage can be calculated as the base fee (per network) plus the fee per byte for the proposed preimage.
After the transaction is submitted, you will see confirmations in the top right corner of the Polkadot.js Apps interface, and the preimage will be added to the list of **preimages**.
#### Submitting a proposal
Once you have committed the preimage (check the previous section), the roadmap's next major milestone is to submit the proposal related to it. To do so, select **Referenda** from the **Governance** dropdown, and click on **Submit proposal**.
Here, you need to provide the following information:
1. **Select the account** from which you want to submit the proposal
2. **Enter the preimage hash** related to the proposal.
3. Click **Submit proposal** and sign the transaction
After the transaction is submitted, you will see confirmations in the top right corner of the Polkadot.js Apps interface. You should also see the proposal listed in the proposals section, displaying the proposed action, proposer, and more.
\
\
\\
# Polkadot
NeuroWeb, formerly known as OriginTrail Parachain, operates as a parachain on the Polkadot network. Polkadot serves as the relay chain, providing shared security and interoperability among various connected chains, including NeuroWeb.
In this relationship, Polkadot's relay chain ensures the security of NeuroWeb by incorporating it into the broader Polkadot network's consensus mechanism. This shared security model enhances the resilience and integrity of NeuroWeb's operations.
Moreover, Polkadot's design facilitates interoperability by allowing different parachains, like NeuroWeb, to communicate and share information across the Polkadot network. This interoperability ensures a seamless flow of data and assets between different blockchains connected to the Polkadot ecosystem.
In essence, NeuroWeb benefits from the shared security provided by Polkadot's relay chain and gains interoperability with other chains within the Polkadot network, fostering a more connected and robust decentralized ecosystem.
Learn more about Polkadot [here](https://polkadot.network/).
# Crowdloan
NeuroWebAI parachain auction 2024
[NeuroWebAI](http://neuroweb.ai) (previously OriginTrail Parachain) extended a parachain slot on Polkadot by winning on [auction #62](https://parachains.info/auctions/polkadot-60-66#neuroweb). NeuroWeb was the [fastest growing parachain](https://twitter.com/DrevZiga/status/1752949817658020092) in the last 6 months (currently ranked #2 for the amount of transactions among all parachains) and has just seen the launch of [knowledge mining BETA](https://x.com/NeuroWebAI/status/1747323072015720474?s=20) & [PolkaBot.ai](https://twitter.com/PolkabotAI), widely showcasing its utility value.
### NeuroWebAI core functionalities
* [x] DKG & EVM Support
* [x] On-chain Governance
* [x] Knowledge mining for Decentralized AI (ongoing)
* [ ] Collators system
* [ ] Community Treasury
* [ ] Knowledge contracts & discovery
NeuroWeb has successfully secured the parachain slot by [winning auction #62](https://parachains.info/auctions/polkadot-60-66#neuroweb) for an additional 2-year period, extending its lease duration. Rewards for crowdloan contributors were distributed on April 11, 2024.
#### Rewards amount
Total rewards distributed in a winning auction: **20,000,000 NEURO**
#### Rewards distribution
* Distribution relative to contributions — 16MM NEURO
* Contributions size #2-50\* — 2MM NEURO (40,816 NEURO per contributor)
* Biggest contributor\* — 2MM NEURO
Hardcap for contributions: 250,000 DOT
Distributed rewards undergo a vesting process:
* 25% available immediately,
* The remaining 75% is vested over a period of 2 years.
Rewards distributed on date: 11.4.2024.
{% hint style="info" %}
The relevant ranking for rewards is determined at the winning block. If there are less than 50 contributors at the time of winning, the undistributed rewards are to be returned to Future auctions pool.
{% endhint %}
.jpg?alt=media&token=320f5009-0932-4ecc-a5a6-3bbb7a56cf45)